OmniParser v2.0 + pyautogui: Local Deployment for Automated Clicking
OmniParser v2.0
OmniParser v2.0 is an advanced automation tool designed to streamline repetitive tasks by enabling customizable, local deployment for various processes. With its integration of pyautogui, it facilitates automated clicking and interaction with on-screen elements, improving workflow efficiency.
Setup and Configuration
Scenario Assumption:
You want to configure OmniParser v2.0 on an Ubuntu server and use a Windows machine to remotely trigger the server for automated office tasks. This setup allows you to leverage the power of Ubuntu’s environment while controlling automation from a more familiar Windows interface.
Rquirements
- An Ubuntu system configured with Anaconda and Git.
- A Windows (or macOS) machine where you want to trigger the automation remotely.
Step1: Set Up OmniparserV2 on the Ubuntu system
conda create -n "omni" python==3.12 -y && conda activate omni

git clone https://github.com/microsoft/OmniParser.git

cd OmniParser

pip install -r requirements.txt
Download the V2 weights:
rm -rf weights/icon_detect weights/icon_caption weights/icon_caption_florence

for f in icon_detect/{train_args.yaml,model.pt,model.yaml} icon_caption/{config.json,generation_config.json,model.safetensors}; do
    huggingface-cli download microsoft/OmniParser-v2.0 "$f" --local-dir weights
done

mv weights/icon_caption weights/icon_caption_florence
huggingface_hub.errors.LocalEntryNotFoundError:
If you encounter the error huggingface_hub.errors.LocalEntryNotFoundError during the download process, you can choose to manually download from the Hugging Face official website or proceed with the following configuration:
pip install -U huggingface_hub hf_transfer -i https://pypi.tuna.tsinghua.edu.cn/simple
export HF_ENDPOINT=https://hf-mirror.com
To run gradio demo, simply run:
python gradio_demo.py
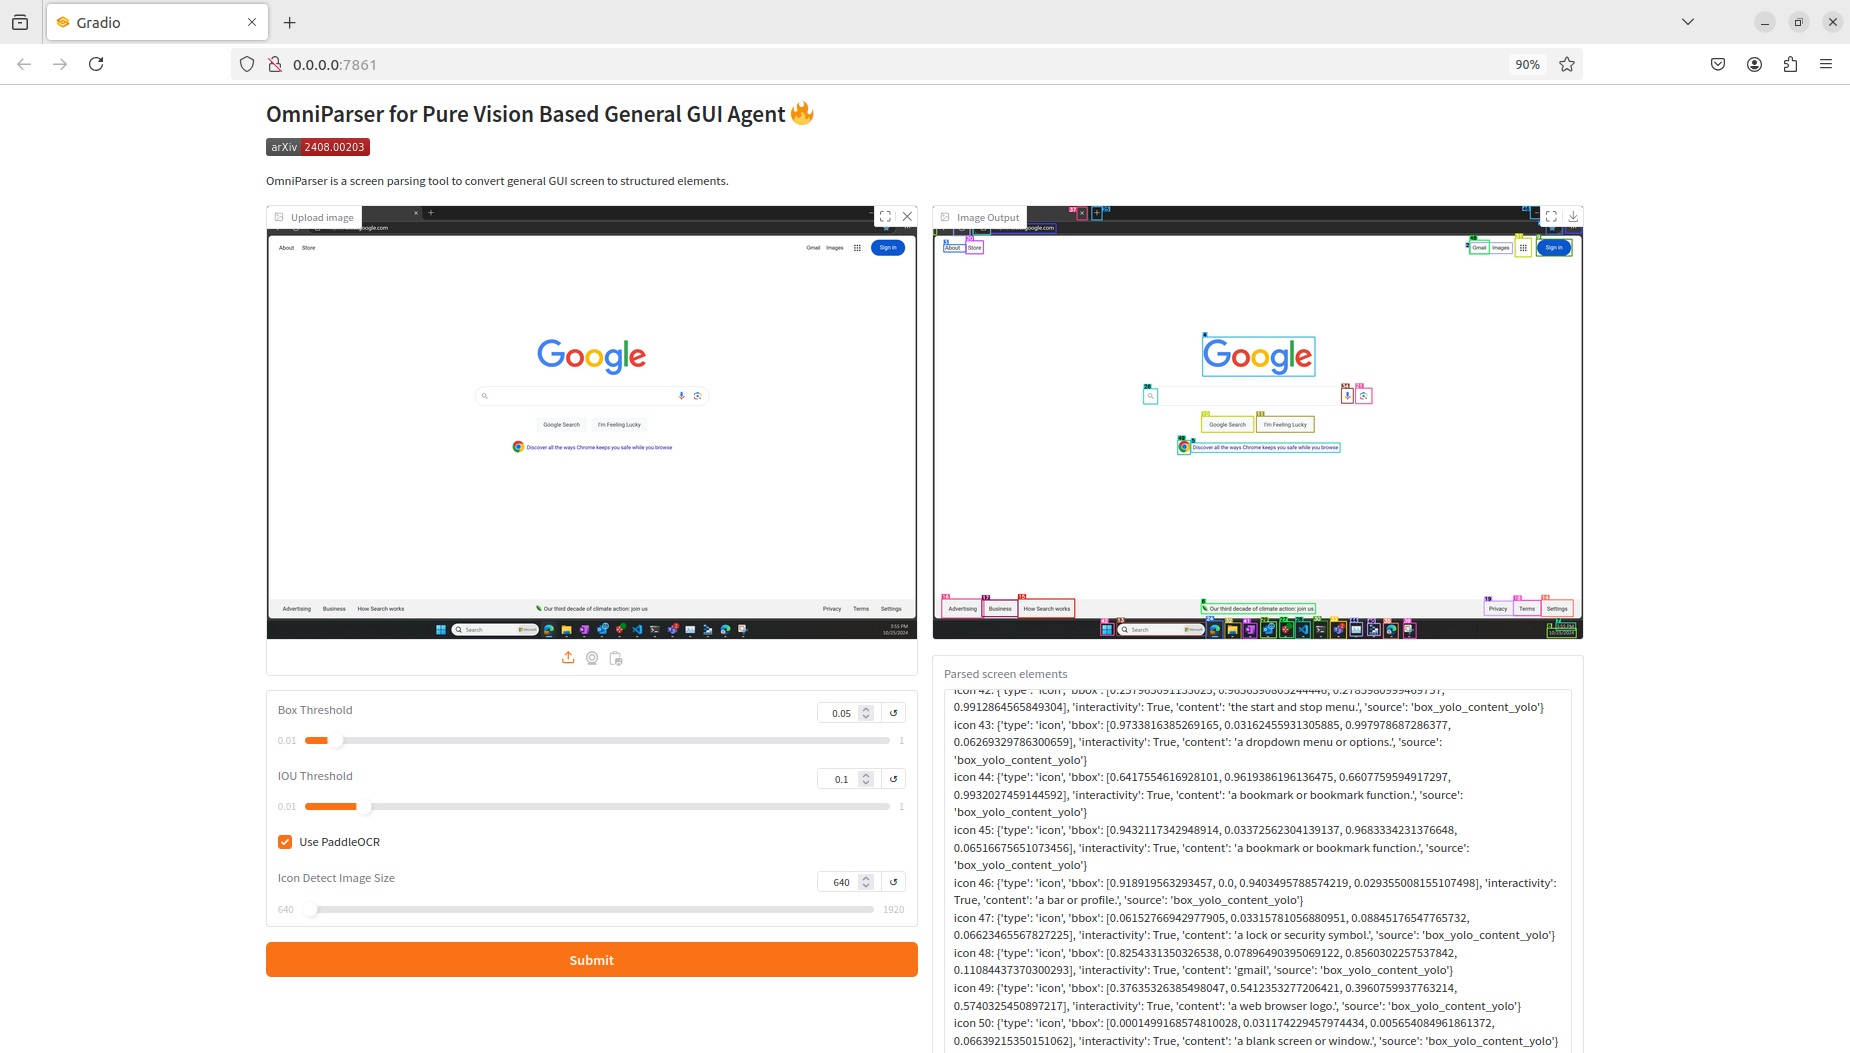
Then, you can access the simple official UI interface for testing by clicking on the provided URL. This allows you to easily verify the installation and functionality of OmniParser v2.0 in a user-friendly environment.
Below is an example of parsing an image of a computer desktop. The top right shows the annotated image, and the bottom right displays the parsed image elements along with their coordinates in JSON format.
Info
Currently, OmniParserV2 has been deployed on the LanGroup Server. Everyone can access and experience the UI interface via the LAN at http://192.168.5.190:7861 (port 7861 has been opened).
At this stage, the OmniParser server can only process screen captures manually uploaded through the UI interface. To further automate the process, we need to configure the system to operate as a server that can interact with remote computers. This way, the remote machine can take screenshots, send them to the server for processing, and receive the analysis results in return.
Step2: Set Up the Ubuntu Server
cd ~/OmniParser

pip install fastapi uvicorn python-multipart pillow requests
main.py to start the server. Simply execute the following command to launch the service:
python main.py
The main.py file is attached at the end of this document for your reference.
Step3: Set Up the Windows Client
pip install pyautogui
test.py to test pyautogui, where the test.py file is attached at the end of this document for your reference.
Run the client.py (a demo script attached at the end of this wiki) to interact with the server and automatically click on specified content
This script will handle the communication with the server, trigger the necessary actions, and perform the automated clicks.
python client.py
Scripts
Server
main.py
# pip install fastapi uvicorn python-multipart pillow requests

from fastapi import FastAPI, UploadFile, File
from fastapi.responses import JSONResponse
import torch
from PIL import Image
import io
import base64
from typing import Optional
import numpy as np

from util.utils import check_ocr_box, get_yolo_model, get_caption_model_processor, get_som_labeled_img

app = FastAPI()

# Initialize model
yolo_model = get_yolo_model(model_path='weights/icon_detect/model.pt')
caption_model_processor = get_caption_model_processor(
    model_name="florence2",
    model_name_or_path="weights/icon_caption_florence"
)

DEVICE = torch.device('cuda' if torch.cuda.is_available() else 'cpu')

@app.post("/process_image")
async def process_image(
    file: UploadFile = File(...),
    box_threshold: float = 0.05,
    iou_threshold: float = 0.1,
    use_paddleocr: bool = True,
    imgsz: int = 640
):
    try:
        # Read the uploaded image

        contents = await file.read()
        image = Image.open(io.BytesIO(contents))

        # Temporarily save the image

        image_save_path = 'imgs/temp_image.png'
        image.save(image_save_path)

        # Configure parameters for drawing the bounding box

        box_overlay_ratio = image.size[0] / 3200
        draw_bbox_config = {
            'text_scale': 0.8 * box_overlay_ratio,
            'text_thickness': max(int(2 * box_overlay_ratio), 1),
            'text_padding': max(int(3 * box_overlay_ratio), 1),
            'thickness': max(int(3 * box_overlay_ratio), 1),
        }

        # Perform OCR processing

        ocr_bbox_rslt, is_goal_filtered = check_ocr_box(
            image_save_path,
            display_img=False,
            output_bb_format='xyxy',
            goal_filtering=None,
            easyocr_args={'paragraph': False, 'text_threshold': 0.9},
            use_paddleocr=use_paddleocr
        )
        text, ocr_bbox = ocr_bbox_rslt

        # Obtain the annotated image and parsed content

        dino_labled_img, label_coordinates, parsed_content_list = get_som_labeled_img(
            image_save_path,
            yolo_model,
            BOX_TRESHOLD=box_threshold,
            output_coord_in_ratio=True,
            ocr_bbox=ocr_bbox,
            draw_bbox_config=draw_bbox_config,
            caption_model_processor=caption_model_processor,
            ocr_text=text,
            iou_threshold=iou_threshold,
            imgsz=imgsz,
        )

        # Format the parsing results

        parsed_content = '\n'.join([f'icon {i}: {str(v)}' for i, v in enumerate(parsed_content_list)])

        return JSONResponse({
            "status": "success",
            "labeled_image": dino_labled_img,  # base64 encoded image
            "parsed_content": parsed_content,
            "label_coordinates": label_coordinates
        })

    except Exception as e:
        return JSONResponse(
            status_code=500,
            content={"status": "error", "message": str(e)}
        )

if __name__ == "__main__":
    import uvicorn

    #! WARNING Here port=9000, you must ensure that the server’s port 9000 is open and accessible.
    # sudo ufw status
    # sudo ufw allow 9000
    uvicorn.run(app, host="0.0.0.0", port=9000)
pyautogui Test
test.py
# pip install pyautogui

from time import sleep

import pyautogui
import time

def bbox_to_coords(bbox, screen_width, screen_height):
    """将 bbox 坐标转换为屏幕坐标."""
    xmin, ymin, xmax, ymax = bbox
    x_center = int((xmin + xmax) / 2 * screen_width)
    y_center = int((ymin + ymax) / 2 * screen_height)
    return x_center, y_center

def click_bbox(bbox):
    """点击指定的 bbox."""
    screen_width, screen_height = pyautogui.size()
    x, y = bbox_to_coords(bbox, screen_width, screen_height)

    # 移动鼠标到指定位置
    pyautogui.moveTo(x, y, duration=0.2)  # duration 是移动时间,单位为秒

    # 点击鼠标
    pyautogui.click()

    print(f"点击了坐标: x={x}, y={y}")

if __name__ == '__main__':

    sleep(5)

    # 示例 bbox (来自您提供的数据)
    bbox = [0.36728453636169434, 0.9408491849899292, 0.39909330010414124, 0.9875121712684631] # chrome

    # 点击 bbox
    click_bbox(bbox)
Client
client.py
import requests
from PIL import Image
import base64
import io
import pyautogui
from time import sleep
import json
import ast  # 用于解析字符串形式的字典

def process_image(
        image_path: str,
        api_url: str = "http://192.168.5.190:9000/process_image", #!!! The ip and port of api_url must be checked!
        box_threshold: float = 0.05,
        iou_threshold: float = 0.1,
        use_paddleocr: bool = True,
        imgsz: int = 640
):
    files = {
        'file': ('image.png', open(image_path, 'rb'), 'image/png')
    }

    params = {
        'box_threshold': box_threshold,
        'iou_threshold': iou_threshold,
        'use_paddleocr': use_paddleocr,
        'imgsz': imgsz
    }

    response = requests.post(api_url, files=files, params=params)

    if response.status_code == 200:
        result = response.json()

        if result['status'] == 'success':
            labeled_image = Image.open(io.BytesIO(base64.b64decode(result['labeled_image'])))
            return {
                'status': 'success',
                'labeled_image': labeled_image,
                'parsed_content': result['parsed_content'],
                'label_coordinates': result['label_coordinates']
            }
        else:
            return {'status': 'error', 'message': result.get('message', 'Unknown error')}
    else:
        return {'status': 'error', 'message': f'HTTP error {response.status_code}'}

def parse_icon_data(content_str):
    """解析包含图标数据的字符串为列表."""
    icons = []
    lines = content_str.strip().split('\n')
    for line in lines:
        if line.startswith('icon '):
            try:
                # 提取花括号中的内容
                dict_str = line[line.index('{'):line.rindex('}') + 1]
                # 解析字符串为字典
                icon_data = ast.literal_eval(dict_str)
                icons.append(icon_data)
            except Exception as e:
                print(f"解析错误: {e}")
                continue
    return icons

def bbox_to_coords(bbox, screen_width, screen_height):
    """将 bbox 坐标转换为屏幕坐标."""
    xmin, ymin, xmax, ymax = bbox

    # 考虑 Mac 顶部菜单栏的偏移
    menu_bar_height = 25

    # 向上偏移以避免点击到文件名
    y_offset = -15  # 向上偏移15像素

    # 计算相对坐标
    x_center = int((xmin + xmax) / 2 * screen_width)
    y_center = int((ymin + ymax) / 2 * (screen_height - menu_bar_height)) + menu_bar_height + y_offset

    # 添加调试信息
    print(f"\n坐标转换详情:")
    print(f"屏幕尺寸: {screen_width} x {screen_height}")
    print(f"原始bbox: {bbox}")
    print(f"x轴变换: {xmin:.4f} -> {xmax:.4f} 中点: {(xmin + xmax) / 2:.4f}")
    print(f"y轴变换: {ymin:.4f} -> {ymax:.4f} 中点: {(ymin + ymax) / 2:.4f}")
    print(f"考虑菜单栏偏移: {menu_bar_height}px")
    print(f"向上偏移: {y_offset}px")
    print(f"计算结果: x={x_center}, y={y_center}")

    # 确保坐标在屏幕范围内
    x_center = max(0, min(x_center, screen_width))
    y_center = max(0, min(y_center, screen_height))

    return x_center, y_center

# def bbox_to_coords(bbox, screen_width, screen_height):
#     """将 bbox 坐标转换为屏幕坐标."""
#     xmin, ymin, xmax, ymax = bbox
#
#     # 考虑 Mac 顶部菜单栏的偏移(大约25像素)
#     menu_bar_height = 25
#
#     # 考虑窗口边框和其他可能的偏移
#     x_offset = 0
#     y_offset = menu_bar_height
#
#     # 计算相对坐标
#     x_center = int((xmin + xmax) / 2 * screen_width)
#     y_center = int((ymin + ymax) / 2 * (screen_height - menu_bar_height)) + y_offset
#
#     # 添加调试信息
#     print(f"\n坐标转换详情:")
#     print(f"屏幕尺寸: {screen_width} x {screen_height}")
#     print(f"原始bbox: {bbox}")
#     print(f"x轴变换: {xmin:.4f} -> {xmax:.4f} 中点: {(xmin + xmax) / 2:.4f}")
#     print(f"y轴变换: {ymin:.4f} -> {ymax:.4f} 中点: {(ymin + ymax) / 2:.4f}")
#     print(f"考虑菜单栏偏移: {menu_bar_height}px")
#     print(f"计算结果: x={x_center}, y={y_center}")
#
#     # 确保坐标在屏幕范围内
#     x_center = max(0, min(x_center, screen_width))
#     y_center = max(0, min(y_center, screen_height))
#
#     return x_center, y_center

def click_bbox(bbox):
    """双击指定的 bbox."""
    # 获取屏幕分辨率
    screen_width, screen_height = pyautogui.size()
    print(f"当前屏幕分辨率: {screen_width}x{screen_height}")

    # 获取点击坐标
    x, y = bbox_to_coords(bbox, screen_width, screen_height)

    print(f"\n即将执行双击:")
    print(f"目标坐标: x={x}, y={y}")
    print("3秒准备时间...")
    sleep(3)

    # 移动鼠标到指定位置
    pyautogui.moveTo(x, y, duration=0.5)

    print("鼠标已就位,1秒后双击...")
    sleep(1)

    # 执行双击
    pyautogui.doubleClick()

    print(f"已双击坐标: x={x}, y={y}")

# def click_bbox(bbox):
#     """点击指定的 bbox."""
#     # 获取屏幕分辨率
#     screen_width, screen_height = pyautogui.size()
#     print(f"当前屏幕分辨率: {screen_width}x{screen_height}")
#
#     # 获取点击坐标
#     x, y = bbox_to_coords(bbox, screen_width, screen_height)
#
#     print(f"\n即将执行点击:")
#     print(f"目标坐标: x={x}, y={y}")
#     print("3秒准备时间...")
#     sleep(3)
#
#     # 移动鼠标到指定位置(使用缓动效果)
#     pyautogui.moveTo(x, y, duration=1, tween=pyautogui.easeOutQuad)
#
#     print("鼠标已就位,1秒后点击...")
#     sleep(1)
#
#     # 获取当前鼠标位置以验证
#     current_x, current_y = pyautogui.position()
#     print(f"当前鼠标位置: x={current_x}, y={current_y}")
#
#     # 点击鼠标
#     pyautogui.click()
#     print(f"已点击坐标: x={x}, y={y}")

def find_dog_avif_coordinates(icons):
    """在解析内容中查找 dog.avif 的图标."""
    for i, icon in enumerate(icons):
        if isinstance(icon, dict) and 'content' in icon:
            content = icon['content'].strip().lower()
            if 'dog.avif' in content:
                print(f"找到 dog.avif,图标索引: {i}")
                return icon['bbox']
    return None

if __name__ == "__main__":
    # 获取并打印屏幕分辨率
    screen_width, screen_height = pyautogui.size()
    print(f"当前屏幕分辨率: {screen_width}x{screen_height}")

    image_path = "s.png"
    result = process_image(
        image_path=image_path,
        box_threshold=0.05,
        iou_threshold=0.1,
        use_paddleocr=True,
        imgsz=640
    )

    if result['status'] == 'success':
        icons = parse_icon_data(result['parsed_content'])
        dog_avif_bbox = find_dog_avif_coordinates(icons)

        if dog_avif_bbox:
            print("找到 dog.avif 坐标:", dog_avif_bbox)
            click_bbox(dog_avif_bbox)
        else:
            print("未找到 dog.avif 图标")
    else:
        print("Error:", result['message'])

# print(f"当前屏幕分辨率: {pyautogui.size()}")
ref: bilibili up - AI超元域